
In this tutorial I’m going to walk you through how to clear your cache in Google Chrome.
What is Cache?
You might be wondering what is cache, or browser cache? Cache are temporary Internet files stored on your computer when you visit a website. Google Chrome and other Internet browsers download files from a website and store them on your computer to help speed up the process of viewing a website. What happens is you visit a website and Google Chrome will download the website’s files (photos, styling layout rules, etc). These are saved so that when you revisit the website you don’t have to load those parts of the website again. Therefore speeding up the process of viewing the website.
The problem come in when you update your website, sometimes you won’t see the newest version of the website because your Internet browser (Google Chrome) doesn’t download the latest version of the website’s file. Therefore you might not see any changes.
There are a few ways to fix that. One way is to wait some time. Automatically after a set period of time (usually 24 hours), those cached files on your computer expire so that the next time you visit the website you’ll get the latest version. But be aware that the expiration time restarts every time you visit the website. So you would have to not visit the website for 24 hours.
There are also sometimes solutions that can be implemented within the code of the website. For example, renaming image files with a new file name will make Google Chrome download the images anew because it believes it to be a new file it never downloaded before. The same can apply for styling rules.
Lastly, an immediate solution that you can do is what’s called clear your cache.
Steps to Clear Your Cache:
Here is a quick tutorial on how to clear your cache.
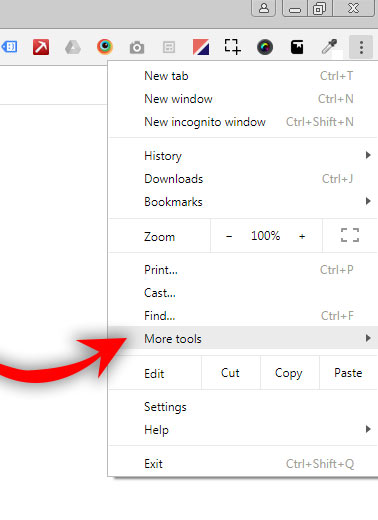
- In the upper right hand corner of your screen click the three dot icon, as seen in the picture below.

- Click “More Tools” from the dropdown menu.
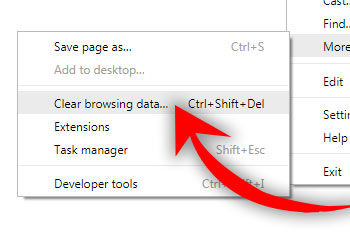
- Click “Clear browsing data” option.
- Make sure the “Cached images and files” blue checkbox is checked and nothing else is checked.
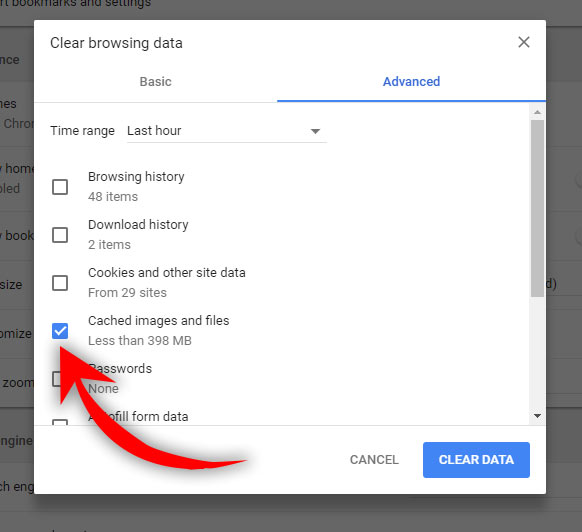
- Click “Clear Data” button.

- That’s it! Now go back to the website or web page and click the refresh button and that should be the most current version of the page/website.


0 Comments